Page 9 - Machine installation instructions
P. 9

EN

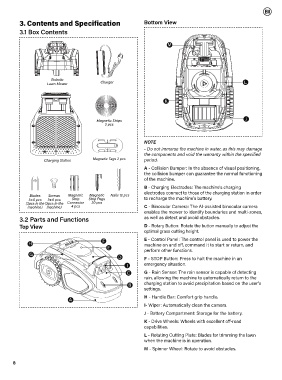
          3..Contents.and.Specification                         Bottom View

          3.1 Box Contents

                                                                          M


                       Robotic
                     Lawn Mower              Charger                                                       L


                                                                        K


                                                                                                            J
                                           Magnetic Strips
                                               2 pcs


                                                                NOTE
                                                                - Do not immerse the machine in water, as this may damage
                                                                the components and void the warranty within the specified
                    Charging Station     Magnetic Tags 2 pcs    period.
                                                                A - Collision Bumper: In the absence of visual positioning,
                                                                the collision bumper can guarantee the normal functioning
                                                                of the machine.
                                                                B - Charging Electrodes: The machine's charging
                                                                electrodes connect to those of the charging station in order
              Blades  Screws   Magnetic   Magnetic   Nails 12 pcs
             3+6 pcs   3+6 pcs   Strip   Strip Pegs             to recharge the machine's battery.
            (3pcs in the (3pcs in the  Connector  20 pcs
             machine)  machine)   4 pcs                         C - Binocular Camera: The AI-assisted binocular camera
                                                                enables the mower to identify boundaries and multi-zones,
          3.2 Parts and Functions                               as well as detect and avoid obstacles.
          Top View                                              D - Rotary Button: Rotate the button manually to adjust the
                                                                optimal grass cutting height.

             H                               F                  E - Control Panel: The control panel is used to power the
                                                                machine on and off, command it to start or return, and
                                                E
              G                                                 perform other functions.
                                                    D           F - STOP Button: Press to halt the machine in an
                                                        I       emergency situation.
                                                        C       G - Rain Sensor: The rain sensor is capable of detecting
                                                                rain, allowing the machine to automatically return to the
                                                         B      charging station to avoid precipitation based on the user's
                                                                settings.
                               A                                H - Handle Bar: Comfort grip handle.
                                                                I- Wiper: Automatically clean the camera.
                                                                J - Battery Compartment: Storage for the battery.
                                                                K - Drive Wheels: Wheels with excellent off-road
                                                                capabilities.
                                                                L - Rotating Cutting Plate: Blades for trimming the lawn
                                                                when the machine is in operation.
                                                                M - Spinner Wheel: Rotate to avoid obstacles.


       8
   4   5   6   7   8   9   10   11   12   13   14